How to Setup a Proxy over an SSH Tunnel on Ubuntu: Examples with Firefox and Chrome
Last updated:- Set up SSH tunnel to a proxy server
- Configure Firefox to use that proxy
- Example for Firefox v 57+
- Chrome
If you need to have your browser access the internet with another IP and you have SSH access a remote server, you can tunnel your connection through that server.
This means that all traffic will pass through the proxy before reaching the Internet.
This is useful for things like:
Accessing your university's proxy so that you can access things like paywalled articles and books.
Mask your IP
Set up SSH tunnel to a proxy server
Description: create a SOCKS proxy on localhost:9999 (choose any unused port) over an SSH connection to <remoteserver> on port <portnum>, using username <user>. You may be prompted for your password.
Template:
$ ssh -D 9999 -f -C -N <user>@<remoteserver> -p <portnum>
Actual Example:
$ ssh -D 9999 -f -C -N johndoe@path.to.proxy.server.edu -p 52831
Configure Firefox to use that proxy
Open Preferences > Advanced > Network
Click Settings:
 Click Settings, in the Network tab
- Select Manual proxy configuration and add a SOCKS host (v5):
 Add a SOCKS host "localhost" and port 9999 (for a tunnel created as per the previous point)
Example for Firefox v 57+
- Go to Settings > Preferences:
 Click the settings button then choose Preferences
- Scroll down and click on "Settings" under "Network Proxy"
 Firefox network Settings
- Configure the proxy you create in the first step:
 Use the information you used in the first step (red markings)
Chrome
Install FoxyProxy for Chrome
Once it's installed, click the plugin icon and choose "Options":
 Click Options
Click "Add new Proxy" and configure it using the information from the first step:
- Under "General", give it some name and optionally some color:
- Under "Proxy Details" add the proxy info proper: Colors can help if you have multiple proxies.
 Colors can help if you have multiple proxies.
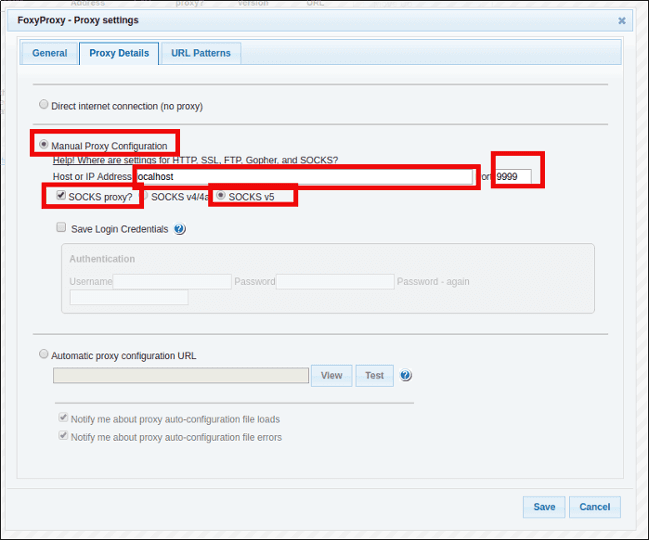 Edit these fields
Click "Save"
- Now select the proxy from the dropdown to activate it:
 Colors help you know which proxy is activated at any time