Using AWS CodePipeline to Automatically Deploy and Build your App Stored on Github as a Docker-based Beanstalk Application
Last updated:
- Intro to Continuous Integration / Deployment
- Docker
- Into to AWS CodePipeline
- PART 1: Have the Code on GitHub and create config files.
- PART 2: Setup a CodePipeline pipeline
- PART 3: Create a repository for your Docker images on AWS ECR
- PART 4: Configure Buildspec.yml and Dockerrun.aws.json
SAMPLE PROJECT MADE USING THIS GUIDE HERE
Intro to Continuous Integration / Deployment
Continuous Integration and Continuous Deployment (CI/CD) are software development principles that are used by most, if not all, mature software enterprises these days.
Roughly speaking, CI/CD amount to having an automatic pipeline that compiles, builds, tests and optionally deploys your project every time a new version is finished.
This goes hand in hand with philosophies such as agile development and microservices architectures.
CI/CD tools are essential for agile product development
This is a good idea for a couple of reasons:
Errors/bugs are identified earlier (easy to fix) rather than later (costly to fix).
New software versions are published very quickly, enabling a faster time-to-market.
It reduces the risk of human error, particularly in crisis situations, where tensions run high and people make mistakes.
There are multiple solutions to address this idea, but recently AWS has put forward their own suite of products, to make your life easier if you already use AWS for other reasons.
Docker
Docker adds yet another layer of stability to your builds and deploys, because you package the whole environment along with the code.
This means no more "it works on my machine" issues. If you're using Docker, it runs everywhere the same way.
AWS Elastic Beanstalk has supported Docker-based applications for some time now. We'll first package our project as a Docker Image and then run that on AWS Elastic Beanstalk.
Into to AWS CodePipeline
AWS CodePipeline is an end-to-end CI/CD software development pipeline that takes you from coding to deploying your app in production, on AWS infrastructure.
Each Pipeline has 3 parts:
Source Provider, where you can choose from:
- GitHub
- AWS CodeCommit
- AWS S3
Build Provider, your choices are:
- AWS CodeBuild
- Jenkins CI
Deploy Provider, using one of:
- AWS CodeDeploy
- AWS ElasticBeanstalk
So you see that there are multiple ways you can setup a CodePipeline pipeline. The last part (deploy provider) is necessarily an AWS-backed service because, after all, AWS isn't about to launch a product to help you deploy to its cloud competitors.
Code Pipeline = Source Provider + Build provider + Deploy Provider
You can, for instance, have a full AWS-based pipeline, with CodeCommit -> CodeBuild -> CodeDeploy.
Or you can choose external providers for the first two providers, with GitHub -> Jenkins CI -> AWS ElasticBeanstalk.
All Examples will use a Scala App, such as the one here: Packaging an Akka-Http Application using SBT and Docker: Simple Example
On this post, we'll explain how to define a pipeline consisting of the following 3 parts:
| Source Provider | Build Provider | Deploy Provider |
|---|---|---|
| GitHub | AWS Codebuild | AWS ElasticBeanstalk |
What you will need
A Docker-based project hosted on Github
AWS Account
PART 1: Have the Code on GitHub and create config files.
In addition to your project's source files, you also need another two config files:
A Build Definition File, which is called
buildspec.yml, in the repository root directory.- Our build definition file will include building/compiling the project, running tests, building the Docker image and publishing that Docker image onto an image registry.
- this is what a dummy buildspec looks like:
# buildspec.yml version: 0.2 phases: build: commands: - run compile_my_project post_build: commands: - echo "Build completed" artifacts: files: - my_output_fileA file specifying where to fetch the Docker image file, which you will use on ElasticBeanstalk. This is called
Dockerrun.aws.json. It also needs to be in the repo root.- This is what a dummy Dockerrun file looks like (see PART 3 for how to obtain the ECR URI)
{
  "AWSEBDockerrunVersion": "1",
  "Image": {
    "Name": "path.to.ECR.repository/image-name:version-tag",
    "Update": "true"
  },
  "Ports": [
    {
      "ContainerPort": "5000"
    }
  ]
}
PART 2: Setup a CodePipeline pipeline
Log in to the AWS console and click on "create a new pipeline" CodePipeline
Under source provider, select "GitHub" and select the repo and branch you want
Under build provider, select "AWS CodeBuild"
- Select "create new build project"
- Under "environment image", select "Ubuntu" -> "Docker" -> "aws/codebuild/docker:1.12.1" (or any newer version available for you)
- Create (or select an existing) service role for CodeBuild that has permissions to access things like S3, Beanstalk and any other AWS services you need (it's probably better to create a new one using the template)
- Open the "Advanced" tab and check the box where it says "Privileged" (this is needed to allow building docker images)
- Click "Save Build project"
Under Deployment provider, select "Aws Elastic Beanstalk"
- Click the link "create a new one in elastic beanstalk"; this will open up a new browser tab, with the beanstalk console.
- On the beanstalk console click "Create a new Application", having "Web Server" type, with "Docker" predefined configuration (you can use a dummy "Sample App" to initialize it)
- Still on the beanstalk console, keep following the wizard and create an environment too. At the end, click "Launch" at the bottom of then screen.
- Now go back to the CodePipeline browser tab, and click the refresh button, and select your newsly created ElasticBeanstalk application and environment.
- Create (or select an existing) service role for CodePipeline that has permissions to access things like CodeBuild, S3, Beanstalk and any other AWS services you need (it's probably better to create a new one using the template)
Click "create pipeline" to finish creation of the pipeline.
You should see something like this now:
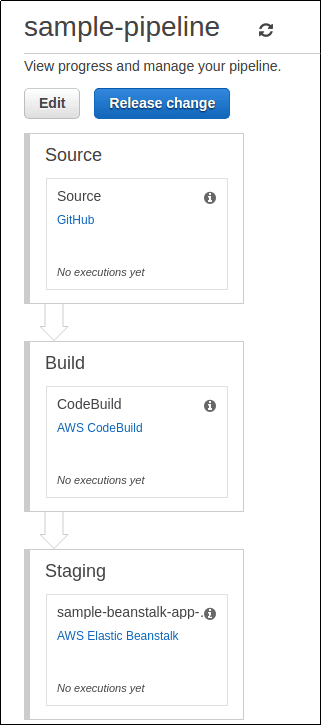 There are no executions yet, as this pipeline has just been created
- Once this is done, any time you push code to your GitHub repository, the full pipeline will be triggered.
PART 3: Create a repository for your Docker images on AWS ECR
AWS ECR (Elastic Container Registry) is part of AWS ECS.
Head over to AWS ECR and click on "Create Repository"
Choose a name for your repo and note down the Repository URI that appears below:
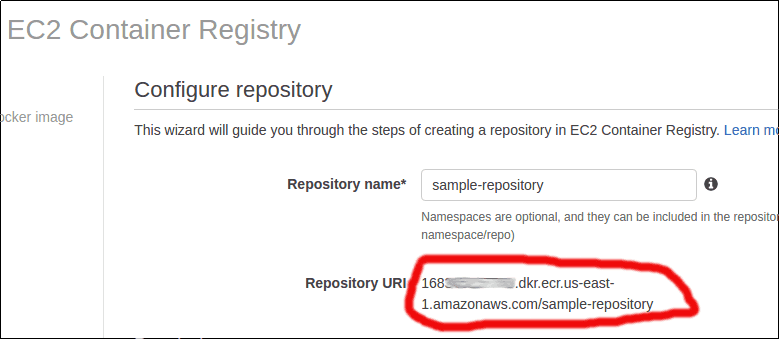 Sample Repository URI. This URI will be used in file Dockerrun.aws.json
- You'll see on the screen the instructions on how to push a Docker image to that Repository.
PART 4: Configure Buildspec.yml and Dockerrun.aws.json
View the files for the sample project here: